Have you ever looked at the ingredient list on a drugstore moisturizer and realized you barely recognized anything after the first few lines?
That confusion is one reason many people start looking into homemade skincare. A good homemade lotion recipe does not require complicated tools or rare ingredients.
A few reliable ingredients, a clean workspace, and a basic understanding of how oils, water, and emulsifiers work together are usually enough.
As a licensed aesthetician who spent years coaching competitive swimmers, I saw firsthand how chlorine, sun, and constant chemical exposure affected skin over time. It pushed me to pay closer attention to ingredients rather than rely on marketing claims.
This guide walks through a simple step-by-step lotion recipe that is practical, customizable, and beginner-friendly.
Why Choose a Homemade Body Lotion?
Making a homemade body lotion gives full control over what touches the skin while allowing flexibility to match personal skincare needs. It reduces exposure to unnecessary additives and works well for sensitive or allergy-prone skin.
It can also be more cost-effective over time, with the added benefit of allowing adjustments to scent, thickness, and texture based on preference.
A typical homemade lotion recipe combines two main parts: the oil phase and the water phase.
The oil phase includes butters and carrier oils that provide nourishment and texture, while the water phase, typically distilled water or aloe vera, serves as the base.
Since oil and water do not mix naturally, an emulsifying wax is used to bind them into a smooth, stable lotion.
Most recipes require only a few ingredients and can be completed in about 30 minutes, making it simple to create a product tailored to dry, oily, or sensitive skin types.
Equipment and Ingredients You Need For Homemade Lotion
Everything required to create a well-balanced, stable lotion from scratch, covering both the formulation components and the tools needed to prepare, mix, and finish the product safely and effectively.
Equipment Needed Before You Start
Essential setup that supports accurate formulation, controlled heating, proper mixing, and safe handling throughout the lotion-making process.
- Two heat-safe beakers or containers
- Kitchen scale (0.1 g accuracy)
- Double boiler or pot with an inch of water
- Immersion blender
- Thermometer
- pH meter or pH strips
- 50% citric acid solution (for pH adjustment)
- Sterilized bottles or jars
Ingredients Necessary For Homemade Body Lotion
Core components that define the lotion’s texture, stability, hydration level, and preservation, ensuring the final product performs well and remains safe over time.
- 538.4 g distilled water
- 64 g glycerin
- 32 g BTMS-50
- 24 g cetyl alcohol
- 80 g apricot kernel oil
- 40 g shea butter
- 4 g Liquid Germall Plus
- 1.6 g vitamin E oil
- 8 g fragrance oil
Homemade Body Lotion: Step-by-Step Instructions
Create a smooth, stable lotion by carefully combining oil and water phases, using proper heating, emulsification, and preservation techniques for safe, skin-friendly results.
Step 1: Weigh and the Water Phase

Measure 538.4 g of distilled water into a heat-safe container, then add 64 g of glycerin. Weigh the container before heating and note the number so you can replace any water lost to evaporation.
Distilled water matters because tap water carries minerals and microorganisms that shorten shelf life. Glycerin is a humectant that draws moisture into the upper skin layers and holds it there, rather than letting it sit on the surface.
Step 2: Weigh and Prepare the Oil Phase
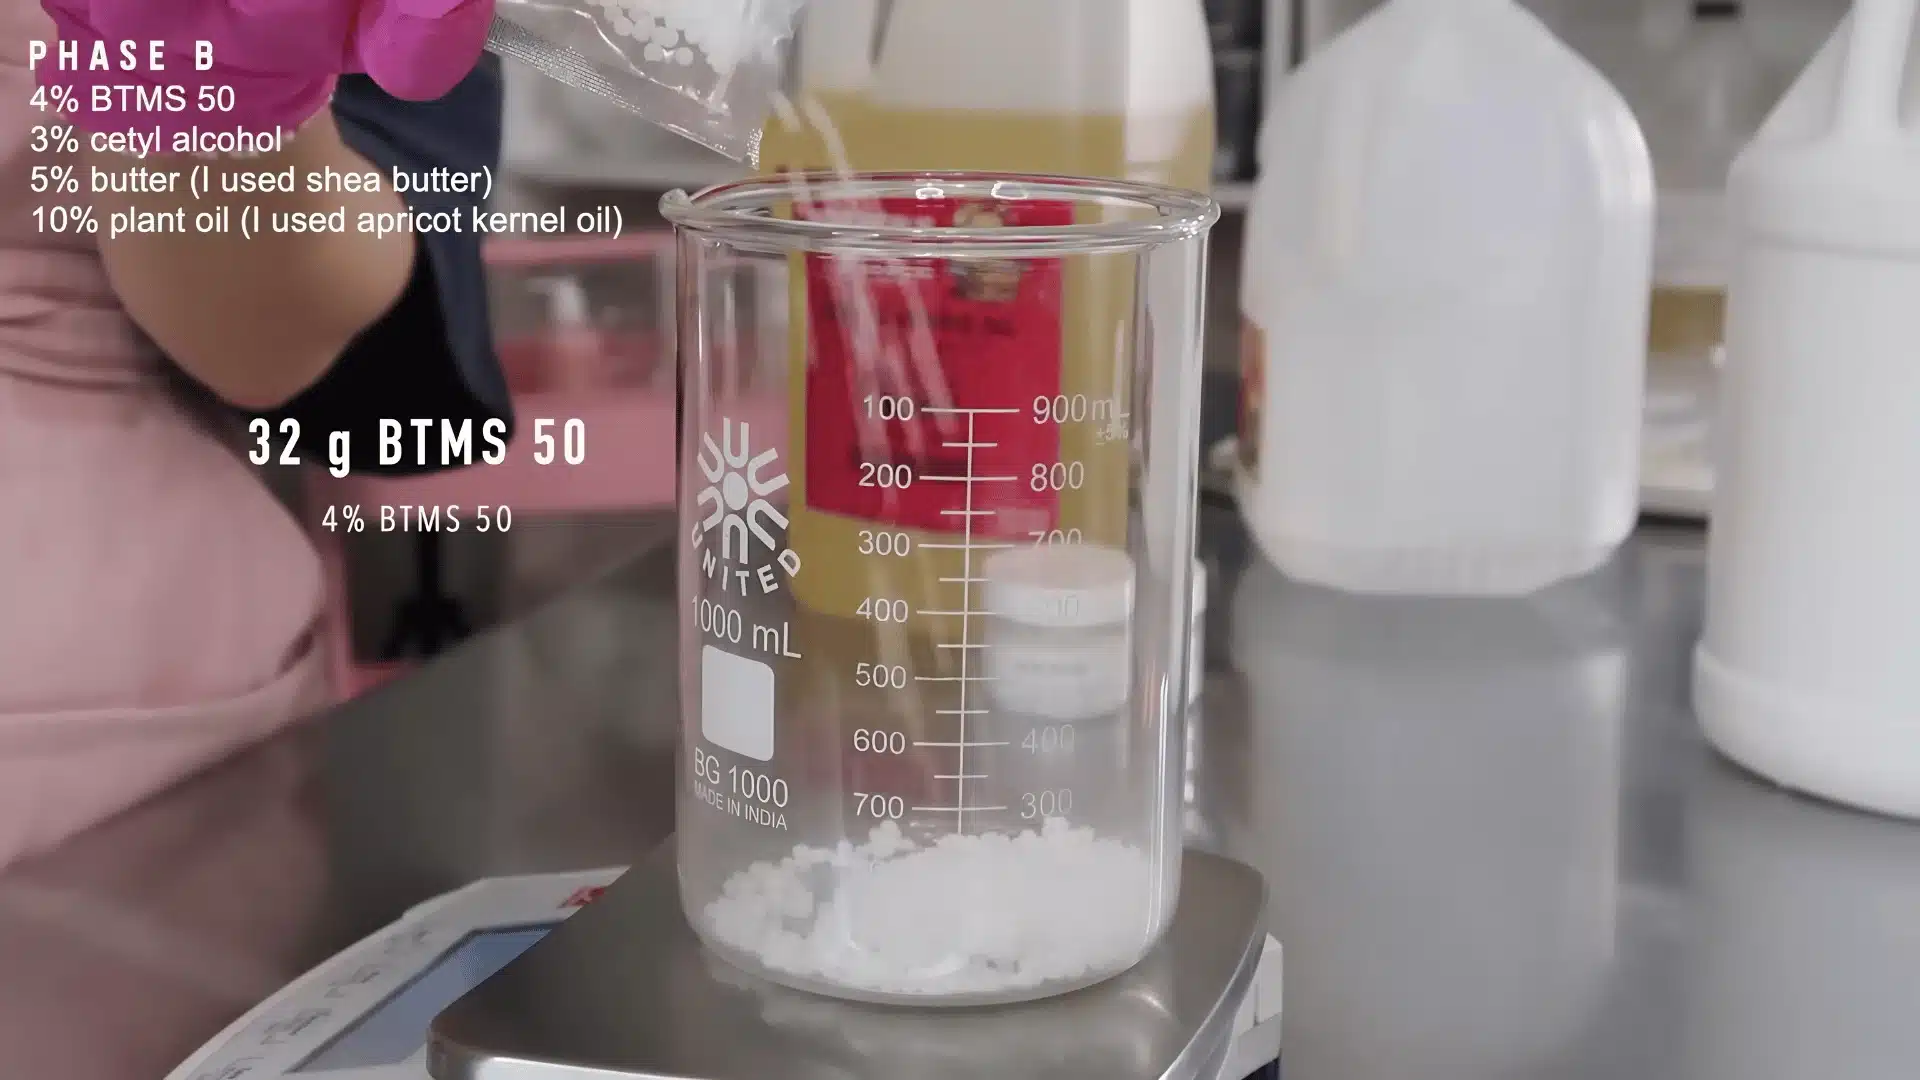
In a separate heat-safe beaker, combine 32 g of BTMS-50, 24 g of cetyl alcohol, 80 g of apricot kernel oil, and 40 g of shea butter. These four ingredients form the conditioning oil phase.
BTMS-50 does double duty: it emulsifies and conditions, which is why this lotion feels soft rather than just moisturizing. Cetyl alcohol thickens the texture.
Apricot kernel oil absorbs without a greasy finish, and shea butter adds depth and nourishment suited to dry skin.
Step 3: Heat Both Phases to The Same Temperature
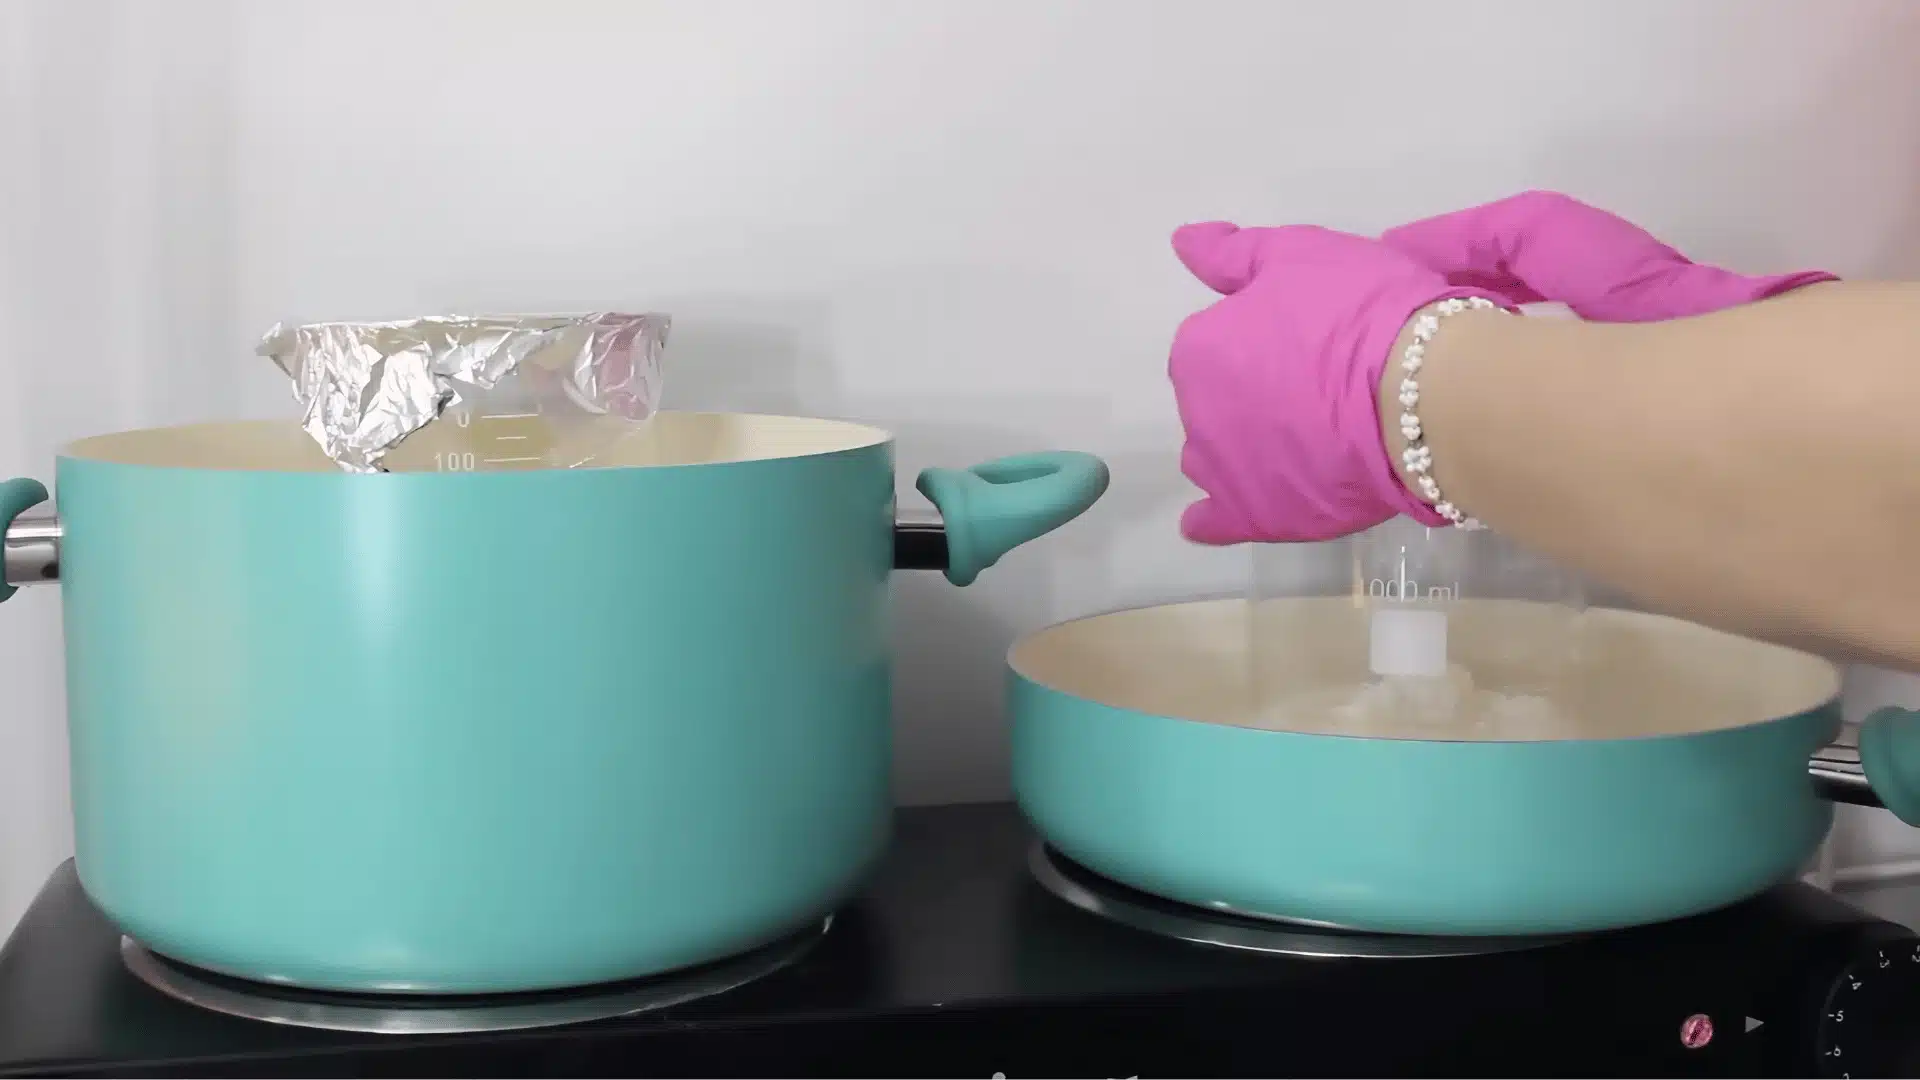
Place both containers in a double boiler and heat them separately until each reaches 70 to 75 degrees Celsius (158 to 167 degrees Fahrenheit). Stir the oil phase periodically so the BTMS-50 melts evenly.
Matching temperatures is the most important technical step in this recipe. When the two phases are at different temperatures, the emulsifier cannot bind them properly, and the lotion separates.
Once both hit the target, remove from heat and top up the water phase to replace any evaporated weight.
Step 4: Combine the Phases and Emulsify
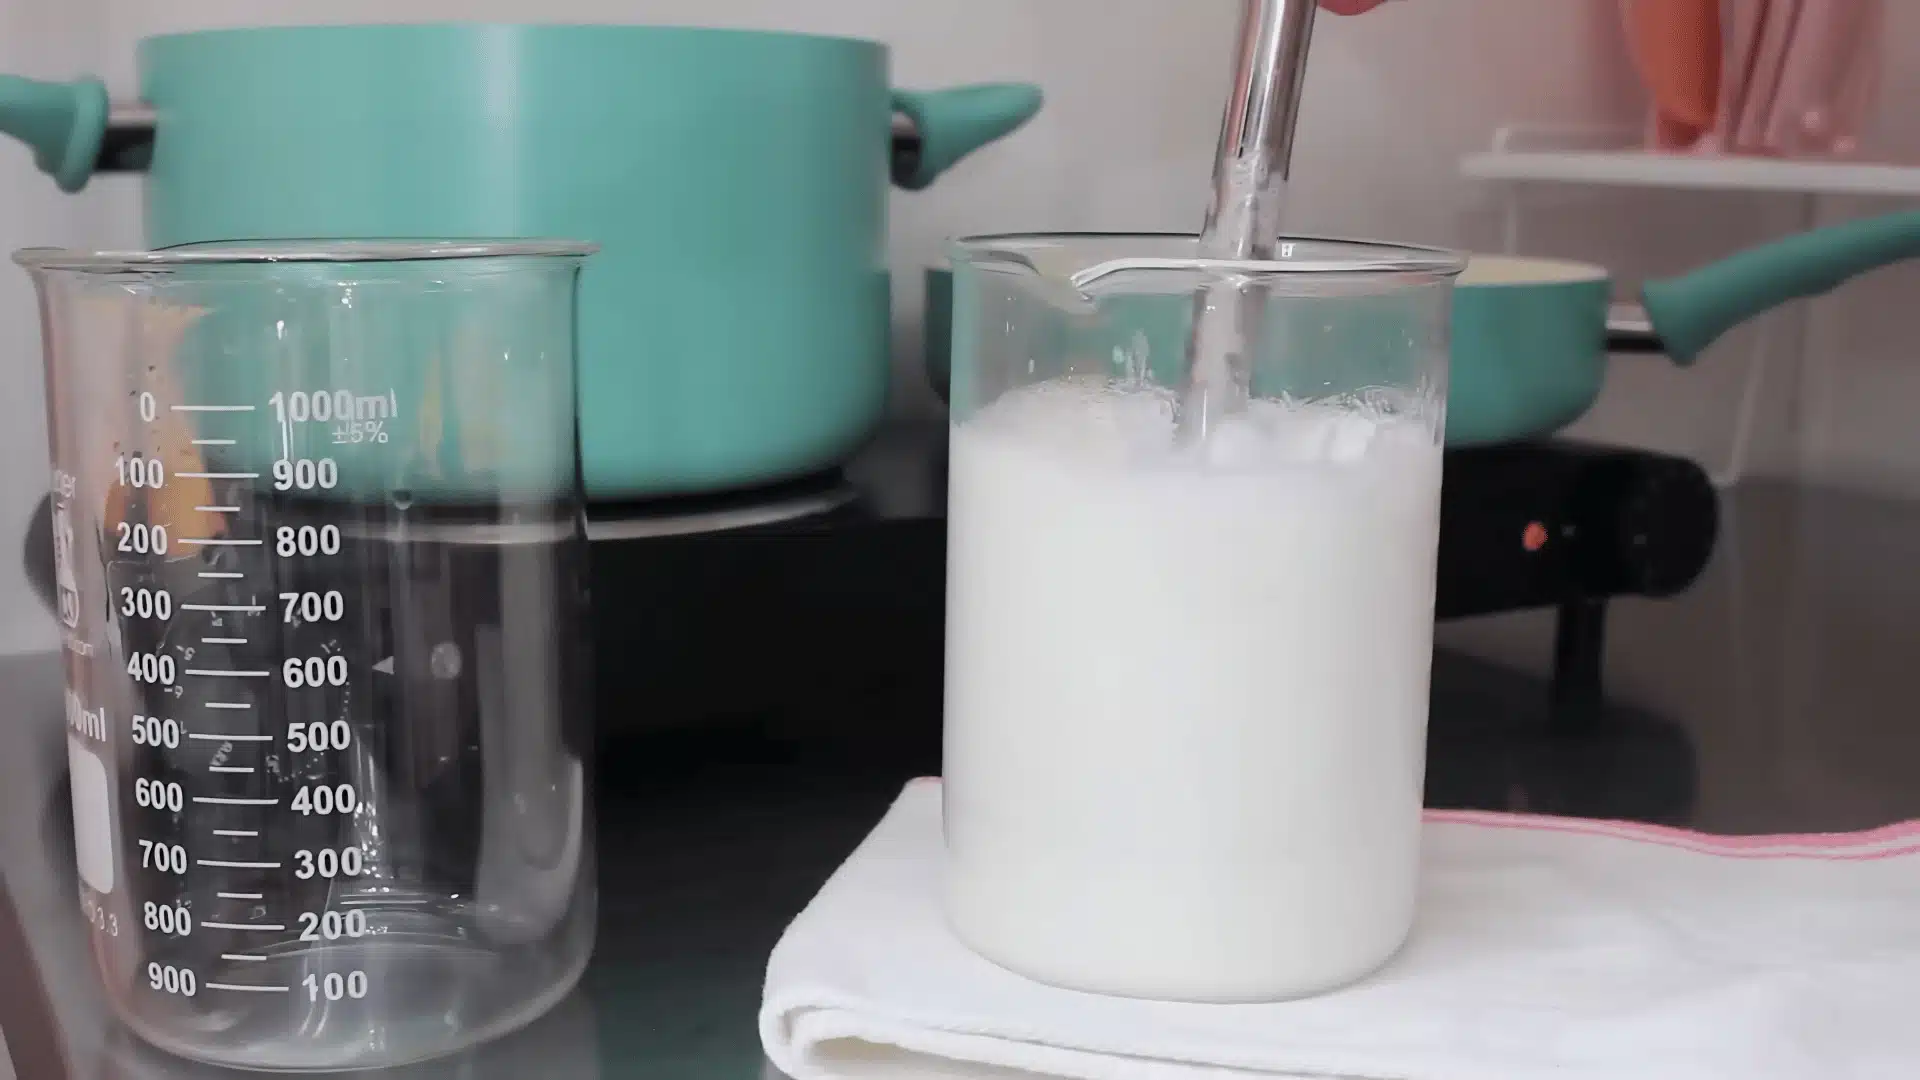
Slowly pour the water phase into the oil phase while blending continuously with an immersion blender. Blend for 1 to 2 minutes until the mixture turns white and creamy, then blend for 1 more minute.
Pouring water into oil gives the emulsifier a better chance to catch. The immersion blender creates the high-shear mixing that forces oil and water droplets to bond. Stirring by hand will not produce the same stable result.
The white color signals a successful emulsion.
Step 5: Cool the Lotion and Check Consistency
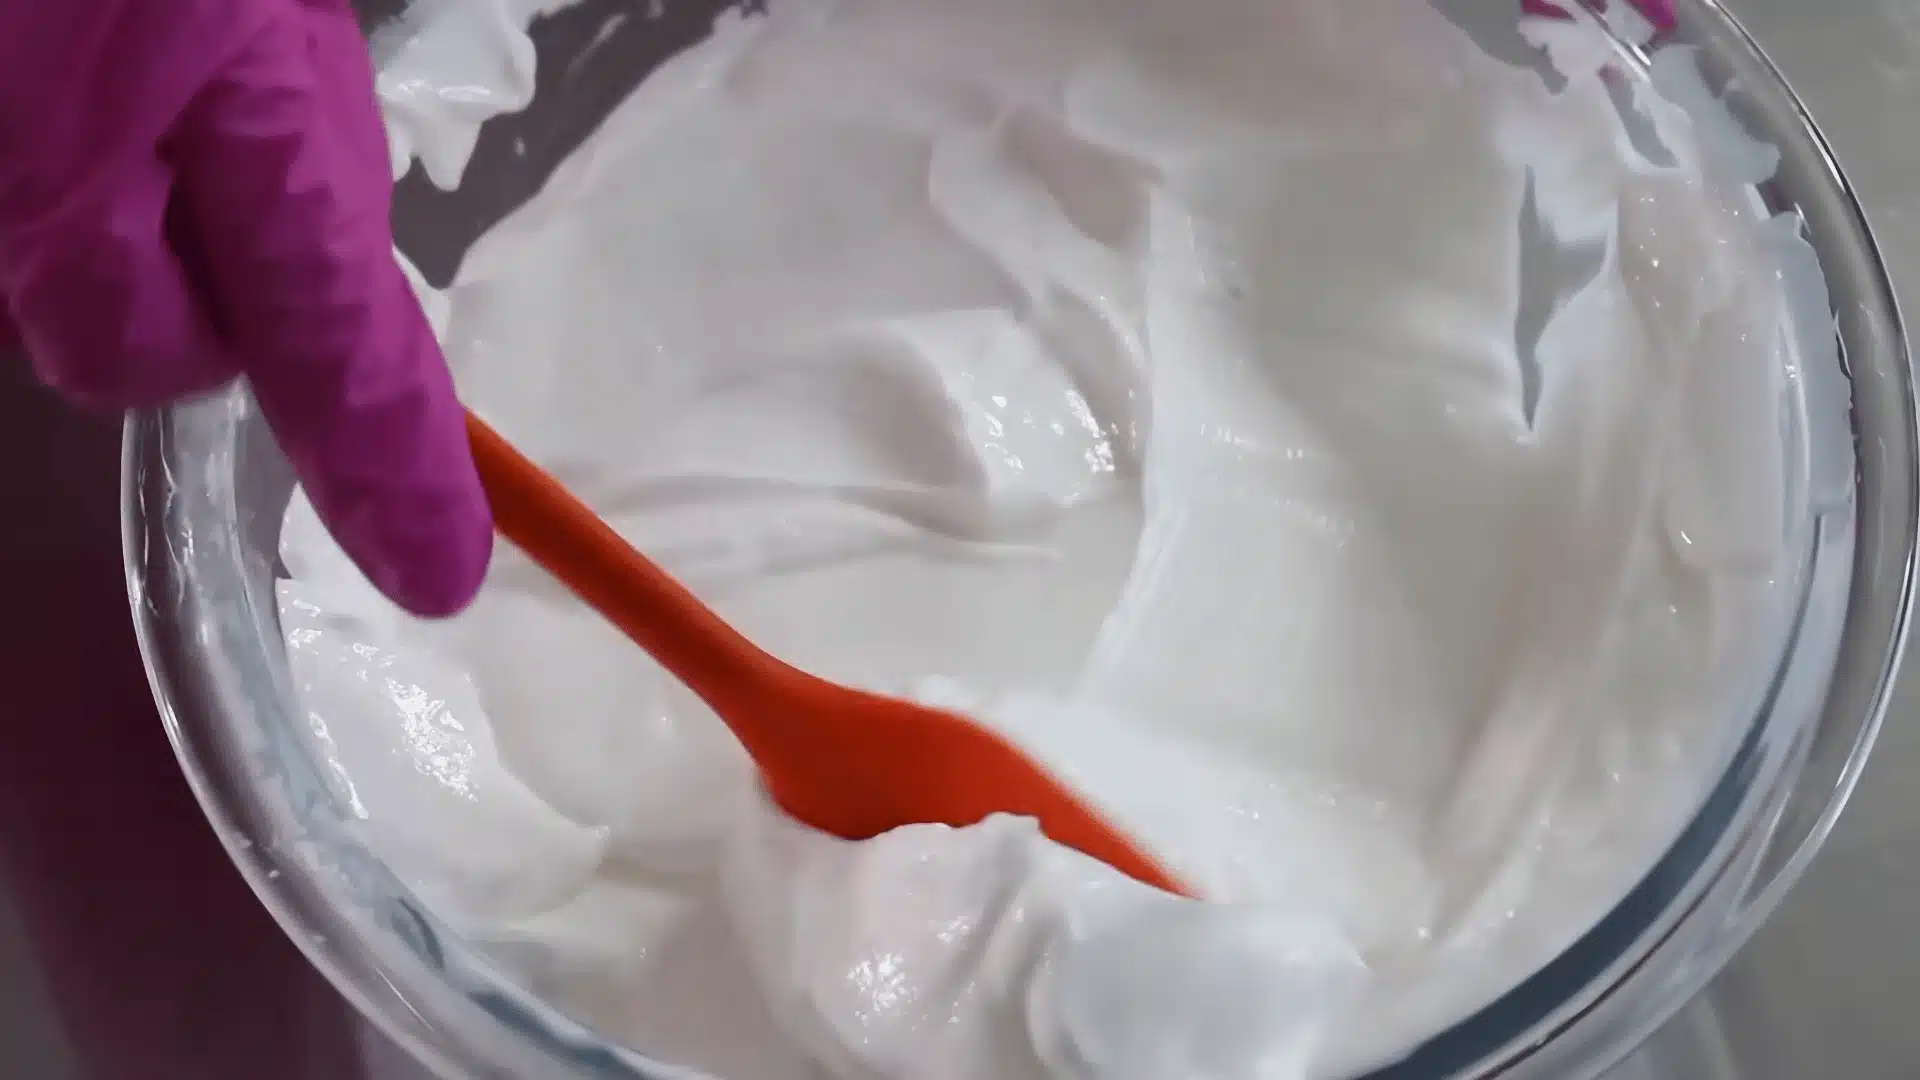
Stir gently with a spatula as the lotion cools. Transfer it to a wide bowl for easier stirring. Do not add any remaining ingredients until the temperature drops below 40 degrees Celsius (104 degrees Fahrenheit).
The lotion will thicken as it cools, so avoid judging the final texture while it is still warm. Adding heat-sensitive ingredients too early can degrade them or destabilize the emulsion.
A bowl makes it easier to evenly stir the phase C ingredients throughout the batch.
Step 6: Add the Preservative, Vitamin E, and Fragrance
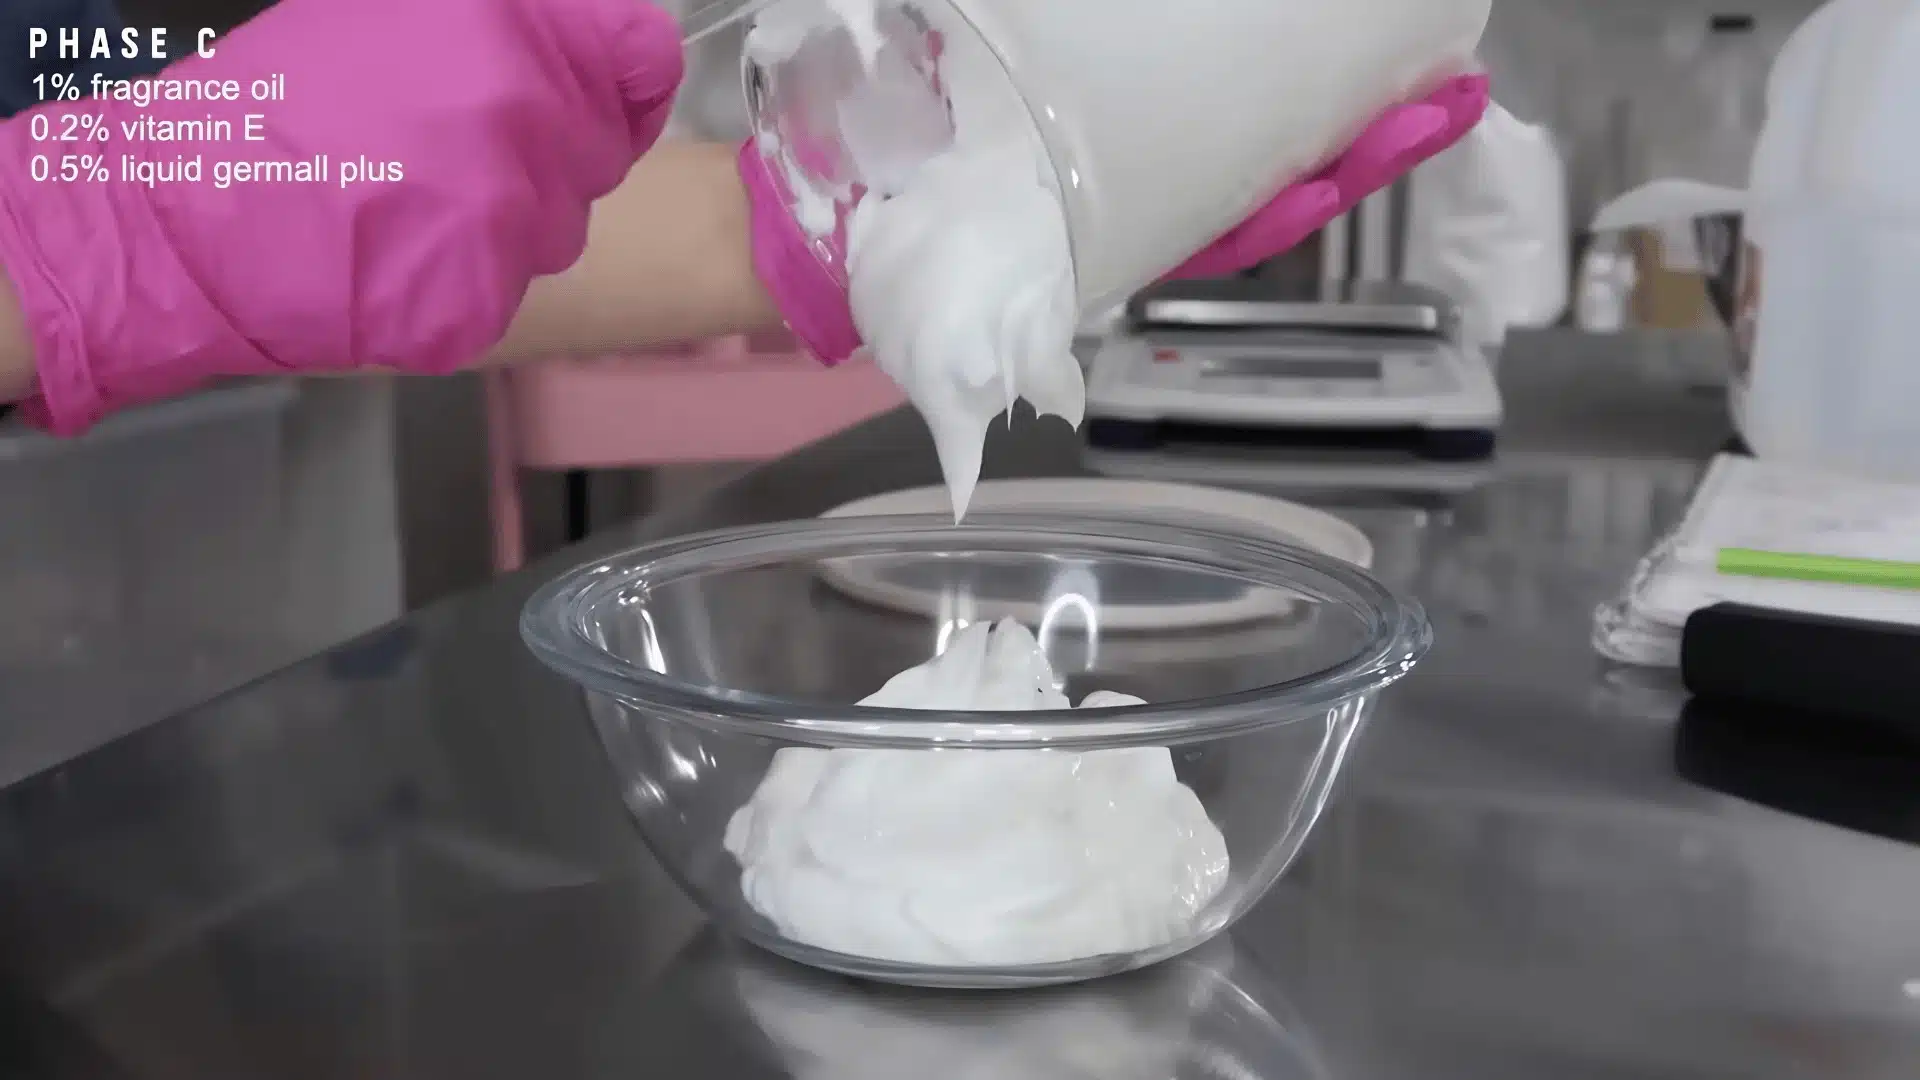
Once the mixture cools below 40 degrees Celsius, add 4 g of Liquid Germall Plus, 1.6 g of vitamin E, and 8 g of fragrance oil. If using a water-soluble dye, dilute it in a small amount of distilled water before adding.
Water-based products require a broad-spectrum preservative, as microbial growth can begin within days without proper protection.
Liquid Germall Plus works well for beginners because it stays stable in emulsions. Vitamin E helps slow oil rancidity but does not replace a preservative.
Step 7: Check the pH and Package the Lotion
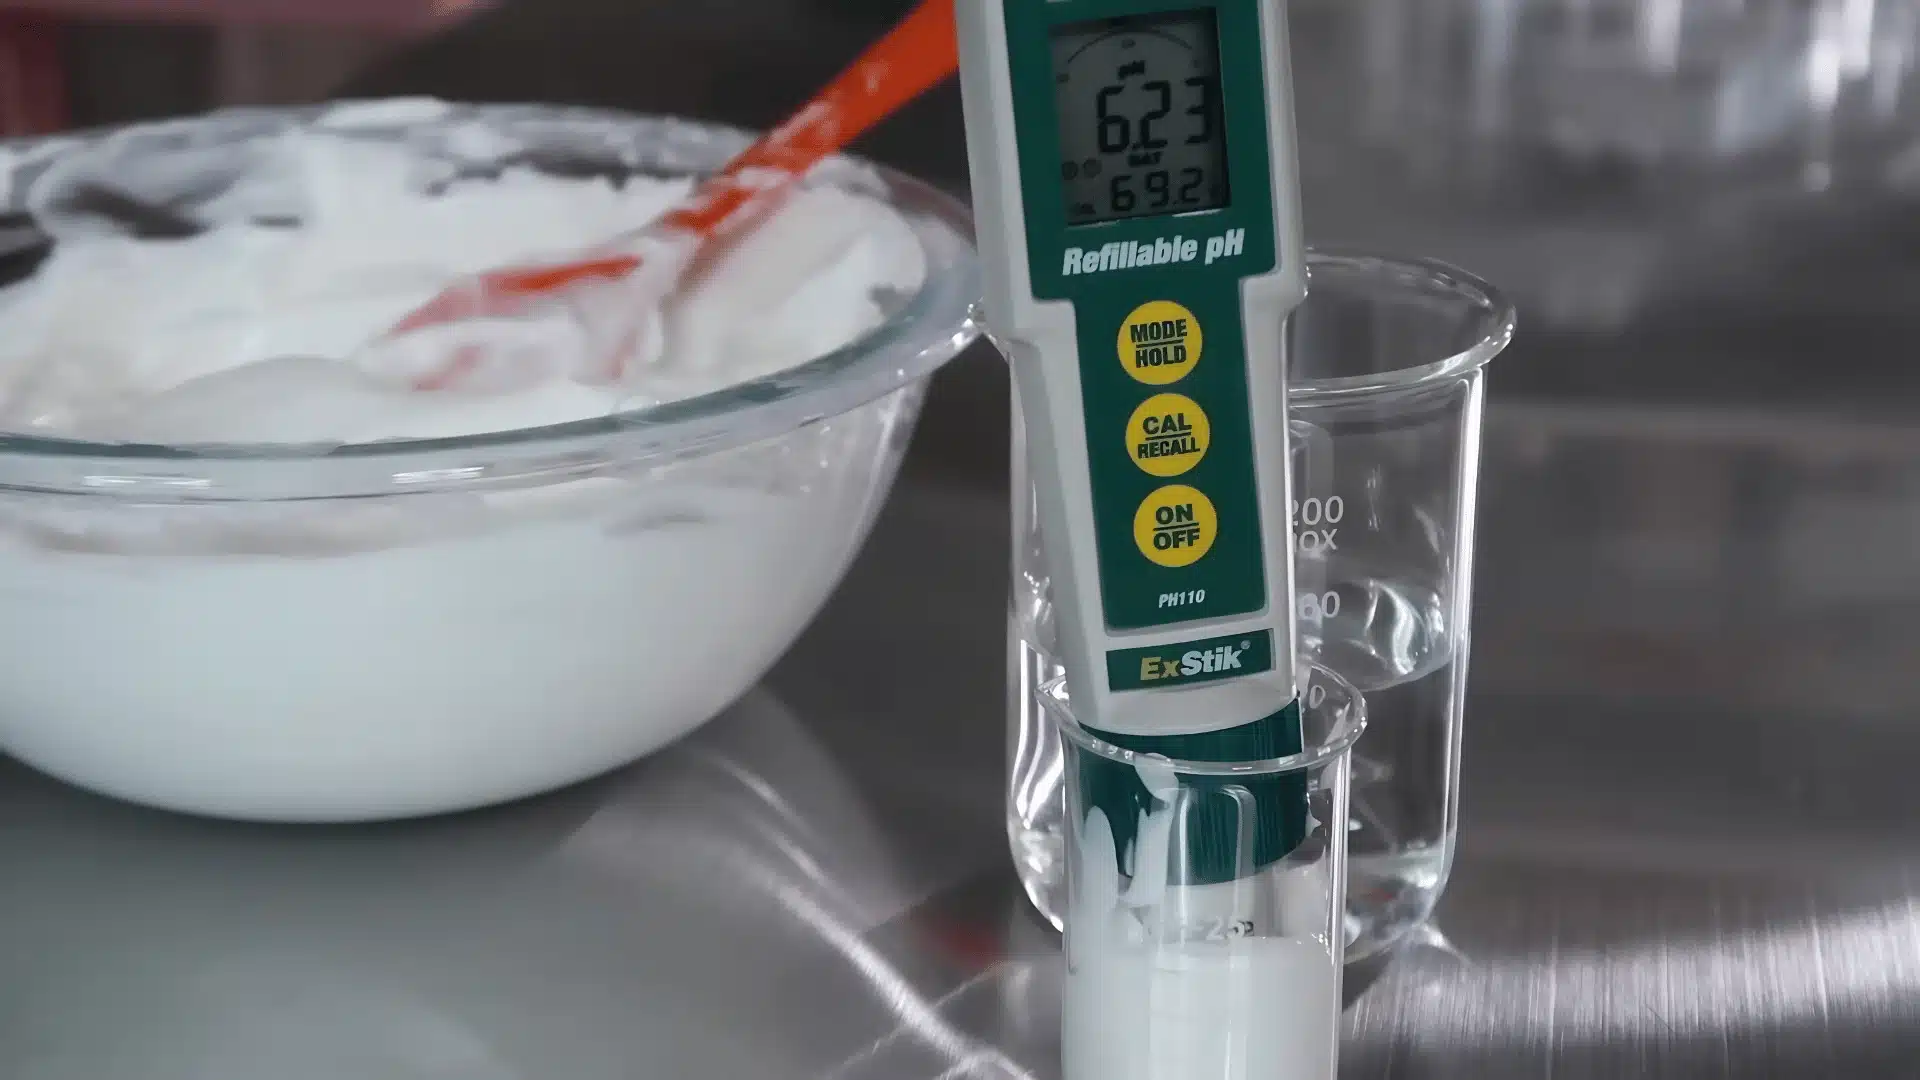
Test a diluted sample of the lotion using a pH meter or strips. The ideal range is 4.5 to 5.5. If the pH is too high, add a few drops of 50/50 citric acid solution, stir, wait one minute, then retest.
Skin naturally sits within this pH range, and products outside it can weaken the barrier. Once adjusted, transfer the lotion into sterilized jars or pump bottles.
For narrow containers, use a zip-lock bag with a corner cut. Leave unsealed for a few hours to set properly.
For a clearer look at each step in action, you can watch this full tutorial below by TaraLee.
Homemade Body Lotion Variations by Skin Type
The base recipe above is a starting point; swap a few ingredients, and the lotion changes completely.
1. For Dry Skin
Replace jojoba with sweet almond oil or avocado oil, and increase shea butter to 15g while reducing water to 65g. Cocoa butter is another option; it’s thicker and absorbs slowly, which means the moisture stays put longer.
The American Academy of Dermatology recommends heavier creams over thin lotions for very dry skin, and a richer oil phase reflects that guidance.
If you want more on shea butter for dry skin, that’s a good place to start before adjusting your ratios.
2. For Oily or Combination Skin
Use grapeseed oil instead of jojoba. It’s lighter, absorbs faster, and doesn’t leave a film on the skin.
Reduce the shea butter to 5g and consider adding a small amount of niacinamide to the water phase.
Research published in the International Journal of Dermatology supports niacinamide’s effect on sebum regulation and skin texture.
3. For Sensitive Skin
Skip fragrance entirely. Swap shea for unrefined mango butter, which tends to be gentler on reactive skin, and add 2g of colloidal oatmeal to the oil phase.
Colloidal oatmeal is cleared by the FDA as a skin protectant and soothes irritation without the active ingredients that might trigger a reaction.
My method is always the same: patch test every new ingredient on the inner wrist for 24 hours before applying to larger areas.
If there is redness, swelling, or itching at the test site, that ingredient is not right for your skin right now. Add one new variable at a time, note what you changed, and adjust from there.
A gentle skin care routine built around fewer variables is always the right place to start. Add one new ingredient at a time, patch test first, and adjust from there.
How to Store Homemade Body Lotion Safely?
Shelf life depends almost entirely on whether you included a preservative. With a properly chosen broad-spectrum preservative, most lotions remain safe for 3 to 6 months.
Without one, any water-based lotion should be used within 5 to 7 days and kept in the refrigerator. Even then, the risk of contamination is real.
The FDA’s cosmetic safety standards are clear: leave-on products containing water need antimicrobial protection. Use a pump bottle rather than a wide-mouth jar when you can.
Dipping fingers into an open jar introduces bacteria every time. A pump keeps the formula clean between uses.
Store away from heat and direct light, and watch for any change in smell, color, or texture. Those are your signs that the batch has turned and needs to be discarded.
Common Mistakes to Avoid When Making Homemade Lotion
Small mistakes can affect texture, stability, and safety, so paying attention to ingredients, measurements, and hygiene ensures a smooth, long-lasting, and skin-friendly lotion.
- Using tap water: Tap water may contain impurities or bacteria, which can reduce shelf life and increase the risk of contamination.
- Adding too much liquid: Excess water disrupts the oil-to-water balance, leading to a thin consistency or separation over time.
- Overheating oils: High heat can degrade the beneficial properties of oils and butters, affecting both texture and skin benefits.
- Not mixing thoroughly: Inadequate blending prevents proper emulsification, resulting in a lumpy or uneven lotion.
- Using unclean containers: Poor hygiene introduces bacteria, which can spoil the lotion and make it unsafe for skin use.
Conclusion
Making your own lotion is less about minimalism and more about choosing what goes on your skin. You decide the oils, the texture, the scent. That control is hard to find in a shelf product.
The basic formula is steady once you follow the ratios: emulsifying wax holds the oil and water together, the oil phase delivers moisture and skin benefit, the water phase keeps the texture light, and a preservative keeps the batch safe.
Adjust from there based on how your skin responds. Start with a small batch, test it for a week. Patch test any new add-in on your inner wrist before using it everywhere.
Once you find a version that works, you’ll stop reaching for moisturizers with ingredient lists you can’t read.
Have a homemade body lotion recipe that’s worked for you? Share your recipe with others in the comments.
Frequently Asked Questions
Can I Make Homemade Lotion without Emulsifying Wax?
You can make a basic whipped body butter without emulsifying wax by blending oils and butters alone, but it won’t contain water and will feel greasier. For a true lotion with a water phase, an emulsifier is required.
How Long Does Homemade Body Lotion Last without a Preservative?
Without a preservative, water-based homemade body lotion should be used within 5 to 7 days and stored in the refrigerator. Bacteria and mold can grow rapidly in water-based formulas, making a broad-spectrum preservative the safer choice for any batch.
Is Distilled Water Necessary, or Can I Use Tap Water?
Tap water contains minerals and microorganisms that can interfere with emulsion stability and shorten shelf life. Distilled water removes these variables and is inexpensive. For a product you’re applying to your skin daily, it’s a straightforward swap worth making.
Can I Use Coconut Oil as The only Ingredient in a Homemade Lotion?
Coconut oil alone is not a lotion; it lacks a water phase and an emulsifier. It moisturizes some skin types but can clog pores for oily or acne-prone skin. A proper homemade lotion recipe needs oil, water, and an emulsifier.