Have you ever tried creating winged eyeliner only to end up with uneven wings, smudged lines, or one eye looking different from the other? Getting that sharp flick can feel difficult, especially when the liner does not follow the shape you want.
Learning how to do winged eyeliner becomes easier when you use the right tools, apply the right technique, and give yourself time to practice.
Small changes, like adjusting the wing angle for your eye shape or using beginner-friendly methods, can make the process smoother.
With the right approach, you can create cleaner, more balanced wings and avoid common mistakes that make eyeliner look uneven.
What is Winged Eyeliner and Why Does It Look Uneven?
Winged eyeliner is a makeup technique where eyeliner extends beyond the outer corner of the eye to create a lifted, elongated appearance.
The flick follows the natural angle of the eye, adding definition and enhancing the overall shape.
Different wing styles create different finishes based on the look you want. A classic wing works well for everyday makeup; a thin wing creates a softer effect; a bold wing adds more drama; and a short wing provides simple definition.
Creating an even wing can take practice, especially when matching both eyes. Planning the shape first, using small strokes, and choosing an eyeliner that is easy to control can help create cleaner and more balanced results.
What You Need Before Applying Winged Eyeliner
Before creating a winged eyeliner look, choosing the right formula can make the application easier and help you achieve a cleaner finish.
Different eyeliner types offer different levels of control, precision, and softness depending on your experience level, and knowing the roles of eyeliner and mascara can help round out the rest of your eye makeup.
| Eyeliner Type | Best For | Key Benefit |
|---|---|---|
| Liquid Eyeliner | Sharp, defined wings | Creates precise lines and bold flicks |
| Pencil Eyeliner | Beginners and soft looks | Offers better control and easy blending |
| Gel Eyeliner | Gradual shaping | Provides control when used with an angled brush |
| Felt-Tip Eyeliner | Easy application | Combines pen-like control with precise lines |
Choosing the right eyeliner formula based on your skill level and preferred style can make creating winged eyeliner simpler and help the look stay neat for longer.
How to Do Winged Eyeliner: Easy Step-by-Step Guide
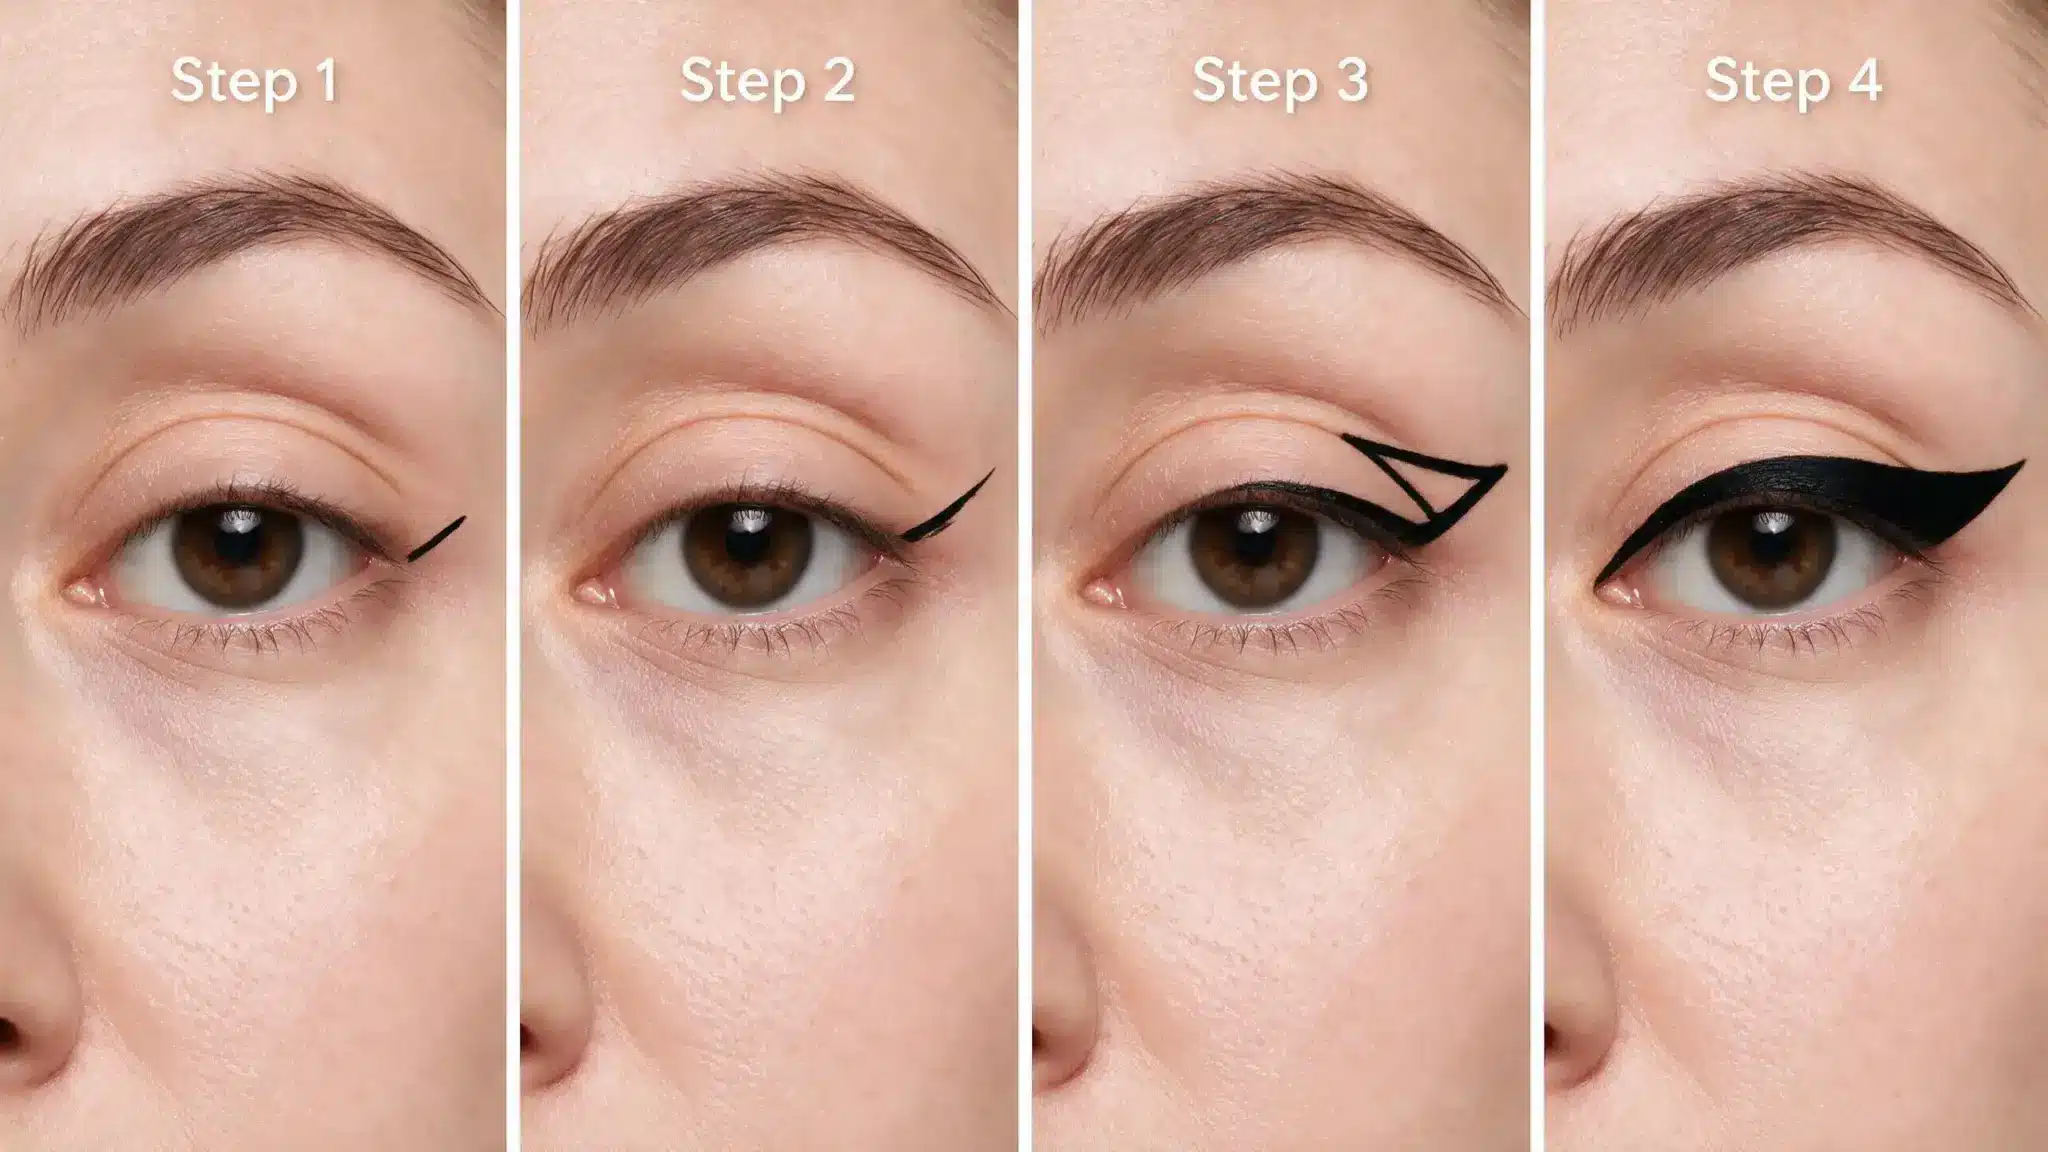
Creating winged eyeliner becomes easier when you build the shape slowly instead of trying to draw it perfectly in one stroke. Start with a light outline, then adjust the length and thickness as needed.
Step 1: Prepare Your Eyelids: Clean your eyelids of oil and residue, then apply primer or concealer for a smooth base. Set lightly with powder or eyeshadow to reduce creasing and help eyeliner stay in place.
Step 2: Mark Your Wing Direction: Use your lower lash line as a guide to find the right angle. Decide the wing length first to help both eyes look balanced.
Step 3: Draw the Outer Wing: Create the flick using small, controlled strokes. Start with a thin line and add more product gradually to avoid making the wing too thick.
Step 4: Connect the Wing to Your Lash Line: Bring the wing back toward your upper lash line to create a small triangle shape. Compare both sides before filling them in.
Step 5: Fill and Clean the Shape: Fill any empty areas and clean, uneven edges with a cotton swab and makeup remover. Add concealer around the edges for a sharper finish.
Taking your time and practicing the shape first can help you create cleaner, more even winged eyeliner.
Tip: Always compare both wings before filling them in completely. Creating a light outline first makes it easier to adjust the angle, length, and thickness without having to remove the entire liner.
Winged Eyeliner Tips for Different Eye Shapes
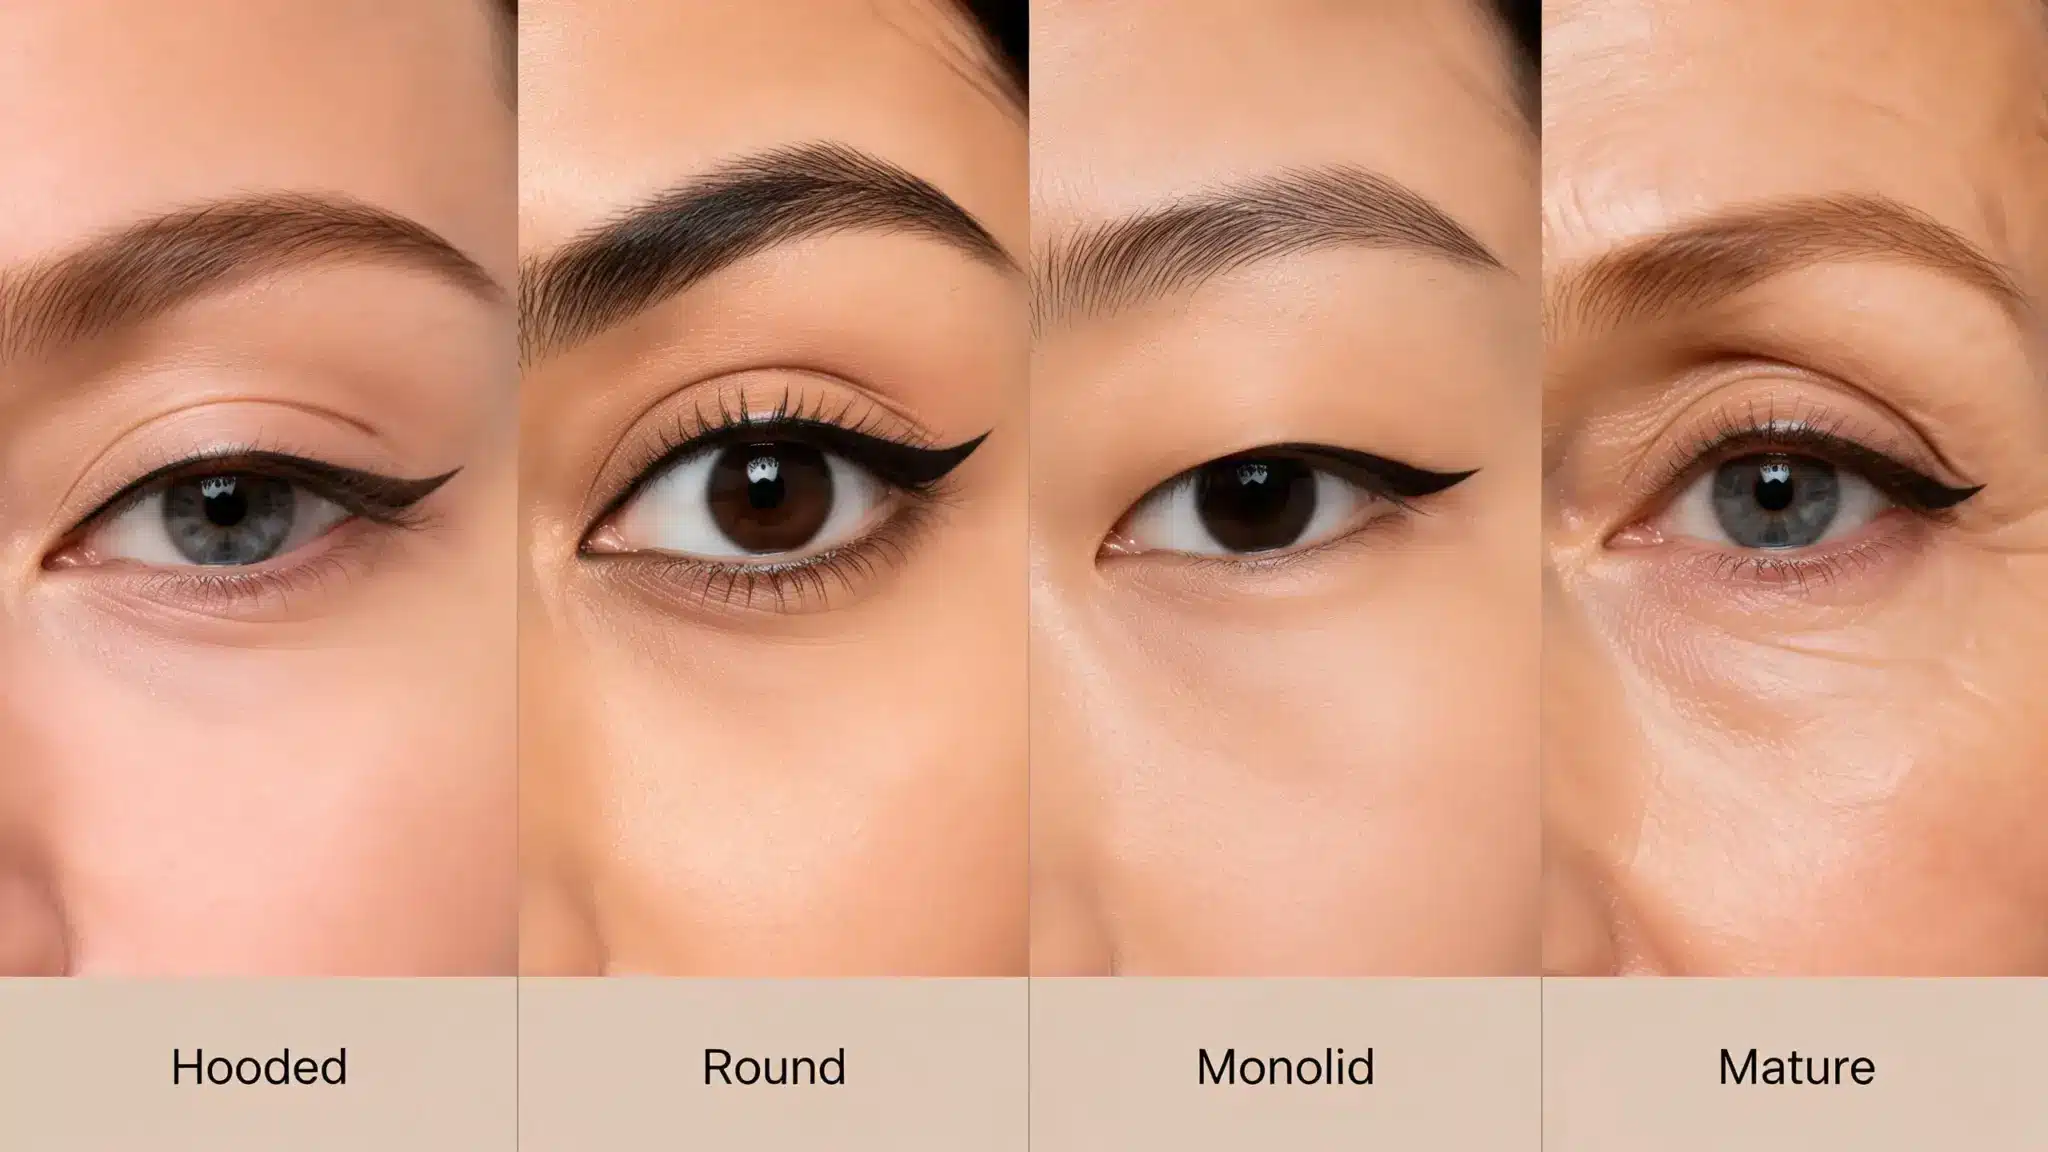
Winged eyeliner can be adjusted for different eye shapes by changing the angle, thickness, and placement to create a balanced and comfortable look, and identifying your eye shape first makes these adjustments easier to apply.
1. Hooded Eyes
Try creating a small flick at the outer corner and check the shape with your eyes relaxed. A thinner lash line with a slightly lifted edge can add definition without making the lid area look heavy.
Tip: Keep the wing thin and place it slightly outward instead of making it too high on the eyelid. Avoid drawing the liner too deep into the crease because it may become hidden when your eyes are open.
2. Round Eyes
Keep the inner corner liner thinner and focus more on the outer corner. This technique helps create a softer shape while adding structure. A slightly angled wing can enhance the natural eye shape without looking too dramatic.
Tip: Extend the wing outward rather than focusing only on lifting it upward. A longer wing can create a more elongated appearance while keeping the eye shape balanced and defined.
3. Monolids
Place the wing where it feels comfortable and visible with your eyes open. A slightly lifted outer flick with a thin-to-medium line can create definition while keeping the look balanced and wearable.
Tip: Adjust the thickness of your wing based on how much lid space is visible when your eyes are open. Avoid making the liner too thick because it can cover the natural eye area and make the wing less noticeable.
4. Mature Eyes
Choose softer lines instead of very thick wings, and keep the outer edge slightly lifted. A shorter, cleaner flick can complement mature eyes while preventing the liner from appearing uneven or heavy throughout the day.
Tip: Avoid pulling the eyelid while applying eyeliner because the shape can change when the skin relaxes. Use gentle pressure and smaller strokes to maintain better control and create a more natural finish.
For safer application around the delicate eye area, follow safe eye makeup practices, such as keeping products clean and avoiding habits that may cause irritation.
Common Winged Eyeliner Mistakes and Quick Fixes
Even with practice, small mistakes can make winged eyeliner look uneven or messy. Knowing what usually goes wrong and how to correct it can help create cleaner lines without starting the entire look again.
| Common Mistake | Why It Happens | Quick Fix |
|---|---|---|
| Wings look uneven | Different angles or pressure | Adjust the shorter wing |
| Wing is too thick | Too much product applied | Clean edges with concealer |
| Eyeliner smudges | Oily eyelids | Use primer and setting powder |
| Wing points downward | Wrong angle placement | Follow the lower lash direction |
| Inner corner looks heavy | Starting too early | Keep inner liner thinner |
Small adjustments can make a noticeable difference when creating winged eyeliner. Instead of wiping off the entire look, fixing specific areas helps maintain the shape and saves time during application.
How to Make Winged Eyeliner Last Longer
A sharp winged eyeliner can lose its shape when exposed to oil, sweat, or moisture during the day, so preparing the eyelid properly and choosing the right setting product can help the liner stay neat for longer.
- Use eyelid primer: Apply a thin layer of eyelid primer before eyeliner to create a smoother base and help the product stay in place.
- Choose long-lasting formulas: Waterproof or long-wear eyeliners are less likely to fade, smudge, or transfer compared with regular formulas.
- Set eyeliner if needed: Lightly apply a matching eyeshadow over the liner to help keep the wing in place and reduce smudging.
- Avoid applying over oily eyelids: Clean excess oil from the eyelid area before applying liner, as oil can cause the product to break down faster.
With the right preparation and products, winged eyeliner can maintain its shape and finish for longer. Small changes in the application routine can help reduce common issues like fading and smudging.
How to Remove Winged Eyeliner Gently
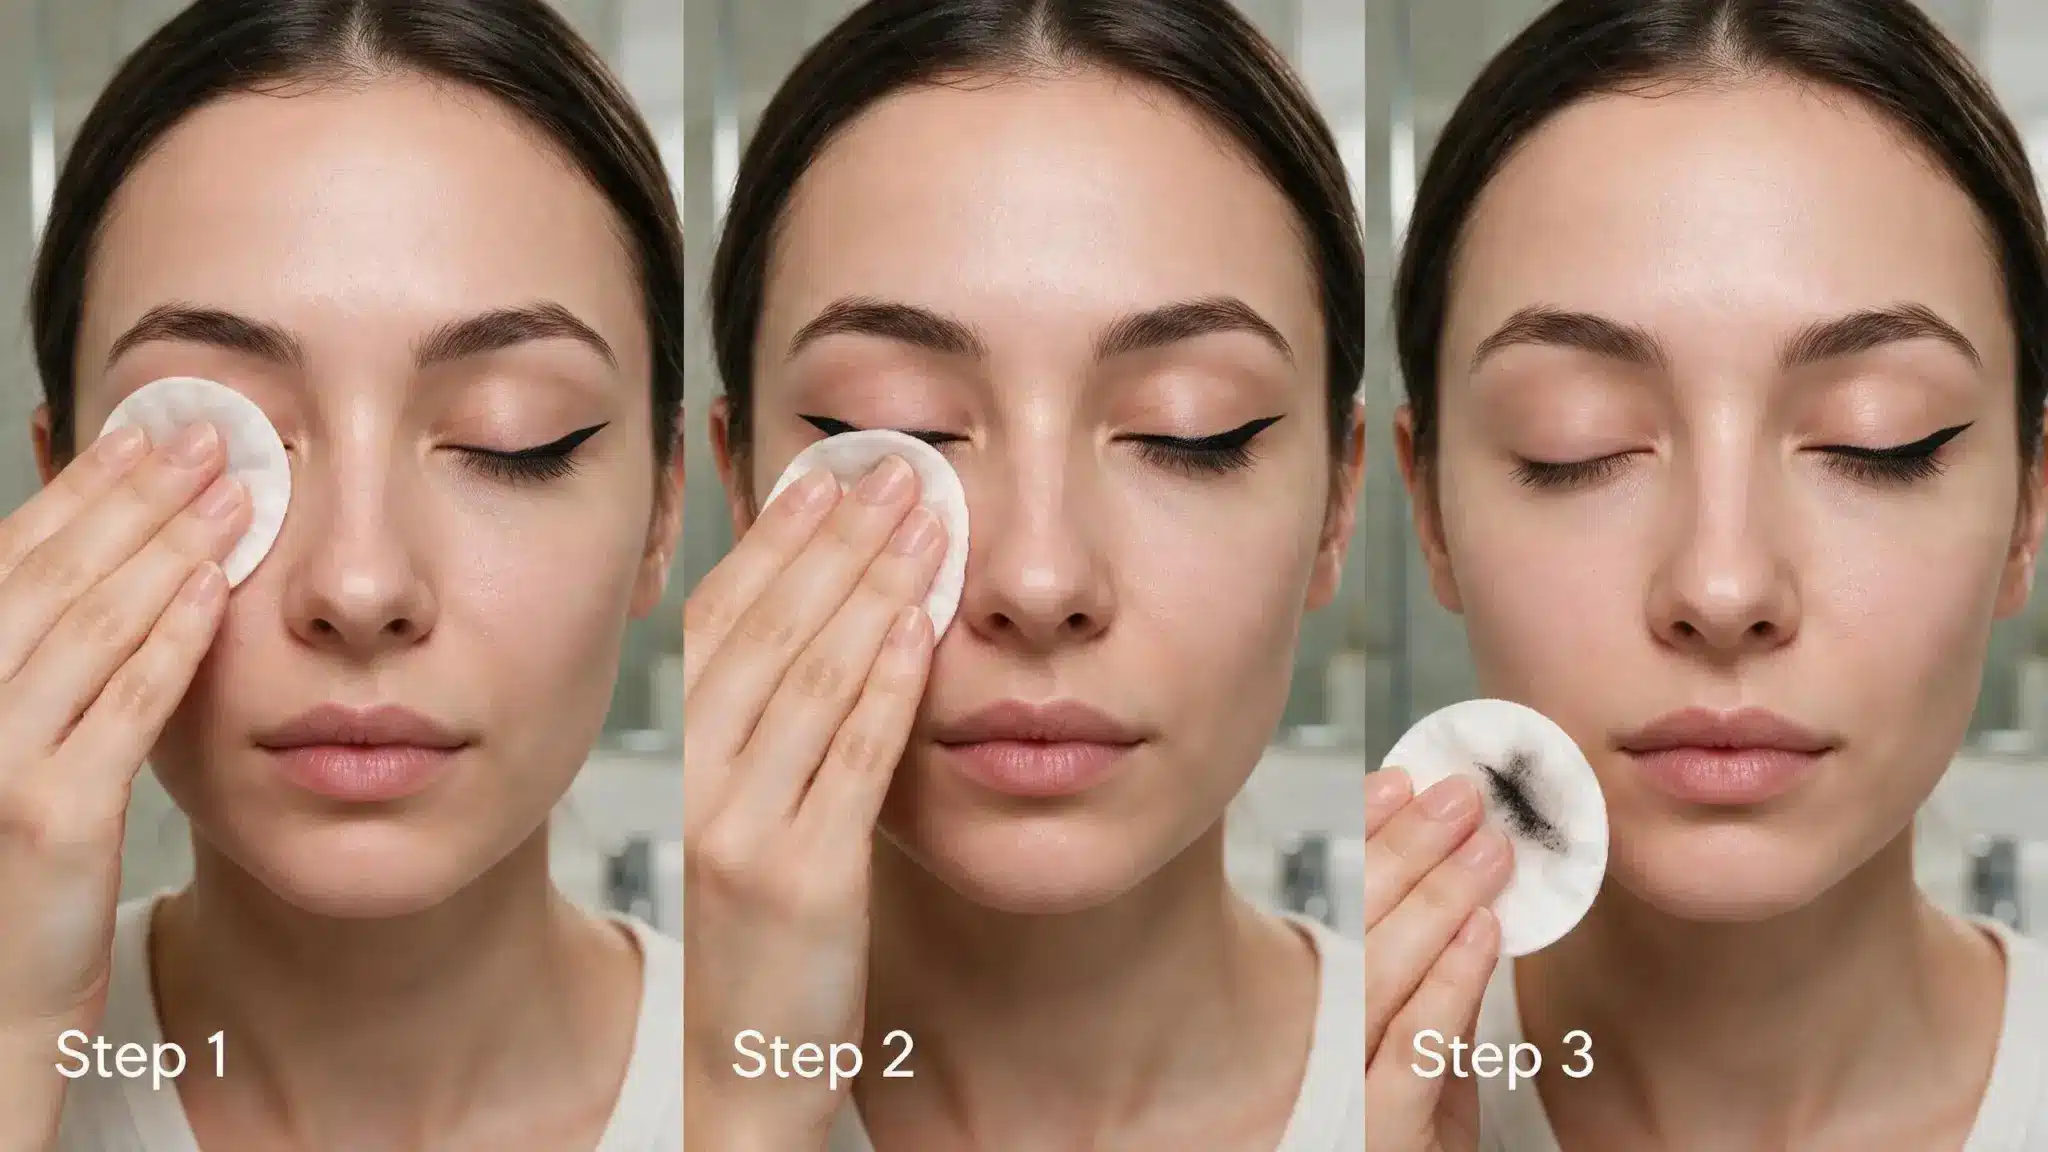
Removing winged eyeliner carefully helps avoid irritation and protects the delicate skin around the eyes. A gentle routine is especially important when using long-wear or waterproof formulas that are designed to stay in place.
- Use makeup remover: Apply an eye makeup remover or micellar water to a cotton pad and hold it over the eyelid for a few seconds. This helps loosen the eyeliner before wiping.
- Avoid rubbing the eye area: Gently swipe the cotton pad instead of scrubbing, as rubbing can irritate the skin and pull on the sensitive eye area.
- Remove waterproof formulas properly: Use an oil-based makeup remover or a product made for waterproof eye makeup to break down the liner without repeated wiping.
A careful removal routine keeps winged eyeliner from irritating your eyes while helping maintain soft, healthy-looking skin around the delicate area.
How to Fix Winged Eyeliner Without Starting Over
Small eyeliner mistakes do not always require removing the entire look. A few simple corrections can help improve the shape while keeping the rest of the makeup intact.
To correct uneven lines, compare both wings while looking straight ahead and adjust the shorter or lower side with small strokes. Avoid adding too much product at once, as this can make the difference more noticeable.
If the wing is too thick, use a clean cotton swab or a small brush with makeup remover to gently remove excess liner from the edges. This helps create a thinner, more balanced shape without disturbing the rest of the eye makeup.
For repairing smudged areas, wait until the liner dries slightly before cleaning it up. Use a cotton swab or a small amount of concealer to remove the smudged sections and restore a cleaner outline.
Using concealer for sharp edges can help refine the wing shape. Apply a small amount along the outer edge with a thin brush to create a smoother finish and make both wings look more even.
The Final Stroke
Creating a clean winged eyeliner look becomes much easier when you focus on the right tools, steady steps, and small corrections along the way.
I found that learninghow to do winged eyeliner is less about getting it perfect immediately and more about building control with practice.
You can get better results by preparing your eyelids, choosing a suitable formula, matching both wings, and fixing mistakes without starting over. These simple habits help create a cleaner finish that lasts longer and feels easier during daily makeup routines.
I hope you try these tips and adjust them to suit your style. Share your experience or your favorite winged eyeliner tricks in the comments below.
Frequently Asked Questions
Can Winged Eyeliner Damage Your Eyes?
Winged eyeliner does not usually harm your eyes when applied and removed properly. Avoid applying products too close to the waterline if they cause irritation, and stop using any liner that creates discomfort.
How Long Does Eyeliner Typically Last Before Expiring?
Most eyeliners should be replaced after several months to a year, depending on the formula and usage. Changes in smell, texture, or application quality can indicate it is time for a new product.
Should You Remove Winged Eyeliner Before Sleeping?
Yes, removing eyeliner before bed helps prevent product buildup and keeps the delicate eye area clean. Use a gentle makeup remover and avoid rubbing harshly to reduce irritation.
Can You Wear Winged Eyeliner With Contact Lenses?
Yes, many people wear eyeliner with contact lenses. Apply makeup carefully, choose eye-safe products, and avoid letting eyeliner particles get into your eyes during application.