
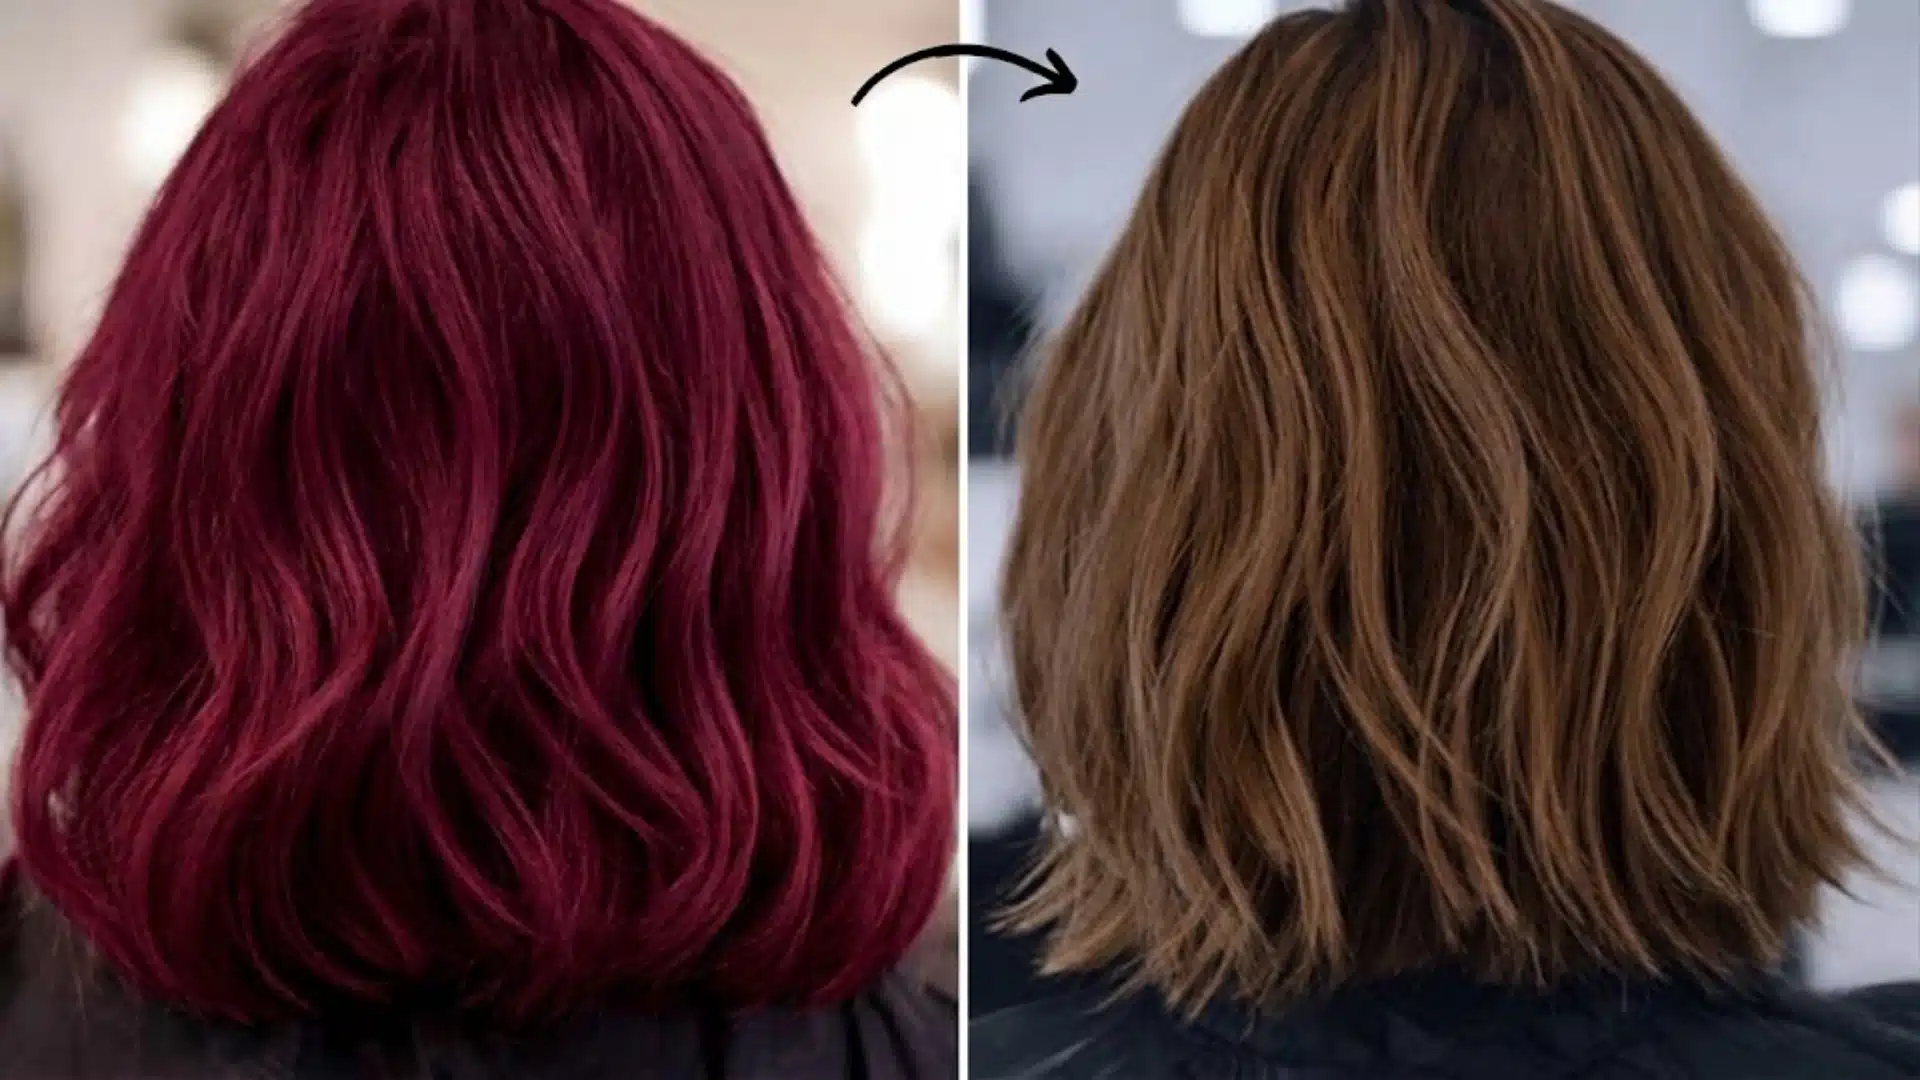
Sometimes hair color turns out darker than you pictured, or a quick box dye choice leaves you regretting it right away.
I get it, you want to fix it fast, but rushing can make your hair feel worse. Semi-permanent dye can often be faded at home with gentle, hair-friendly methods.
With permanent dye, the aim is careful fading rather than complete removal, so you do not put your hair through extra stress.
In this guide, I’ll cover what actually helps, what is not worth the hype, and how to keep your hair protected along the way.
By the end, you’ll know how to correct your color safely, with less panic and less damage.
How to Remove Hair Dye at Home Safely
How your hair holds color really shapes how easily it can be lifted, and I’ve learned this makes all the difference when I try to remove dye at home.
Temporary dyes are the simplest; they mostly coat the hair’s outer layer and usually wash out within a few shampoos, so you can often see results quickly.
Semi-permanent dyes sit a bit deeper and fade gradually with repeated washing, and home methods work well if you’re patient.
Permanent dyes are more stubborn because they chemically change the hair’s inner structure through a peroxide reaction, a mechanism confirmed by hair cosmetics research, which no home remedy can fully reverse.
Hair porosity also matters. High-porosity hair absorbs dye quickly but releases it faster, which helps with fading.
Low-porosity hair holds onto color more tightly and may need multiple gentle treatments to shift.
When I work on my hair, I always pay attention to its texture and condition first, choosing a method that’s steady, gentle, and won’t compromise its health or shine.
What to Know Before Removing Hair Dye
Before grabbing ingredients or treatments, it’s important to understand your hair and the dye you’re using. Knowing these details helps you avoid extra sessions and protects your strands.
- Type of dye: Semi-permanent and demi-permanent colors respond well to home removal. Permanent dye requires realistic expectations; your goal is controlled fading, not full removal in one go.
- Time since application: Color applied within the last 48 hours is generally easier to lift. Older dye molecules embed more deeply, slowing their removal.
- Hair condition: Bleached, brittle, or repeatedly processed hair needs gentler methods and extra conditioning between rounds. If your hair snaps or feels gummy, pause and condition first.
- Strand test: Always test your chosen method on a small hidden section. Leave it for the full intended time to see how your hair reacts before committing to a full application.
- Common mistake: Skipping the strand test is the most frequent reason color correction turns into a lengthy repair instead of a simple fix. Taking five minutes saves both hair and time.
Best Home Remedies to Remove Hair Dye

To gently fade or lift hair dye at home, you can try a few methods that work best on semi-permanent and demi-permanent color. Each option has benefits, limits, and steps you should follow to keep your hair healthy.
If the process leaves staining around your hairline or forehead, our post on removing dye from your skin covers the quickest fixes.
1. Vitamin C
Vitamin C is one of the most effective and least damaging options for removing semi-permanent and demi-permanent dye.
The ascorbic acid oxidizes color molecules, loosening them from the hair shaft so they can wash out gradually.
I usually crush 10–15 vitamin C tablets, or use a powder alternative for quicker dissolution, and mix it with a clarifying shampoo to form a thick paste.
Apply this to damp hair, cover with a shower cap, and leave it on for 30–60 minutes. Rinse thoroughly and condition immediately.
Repeat every two to three days as needed. Permanent color may fade slightly over several sessions, but it won’t fully strip the color.
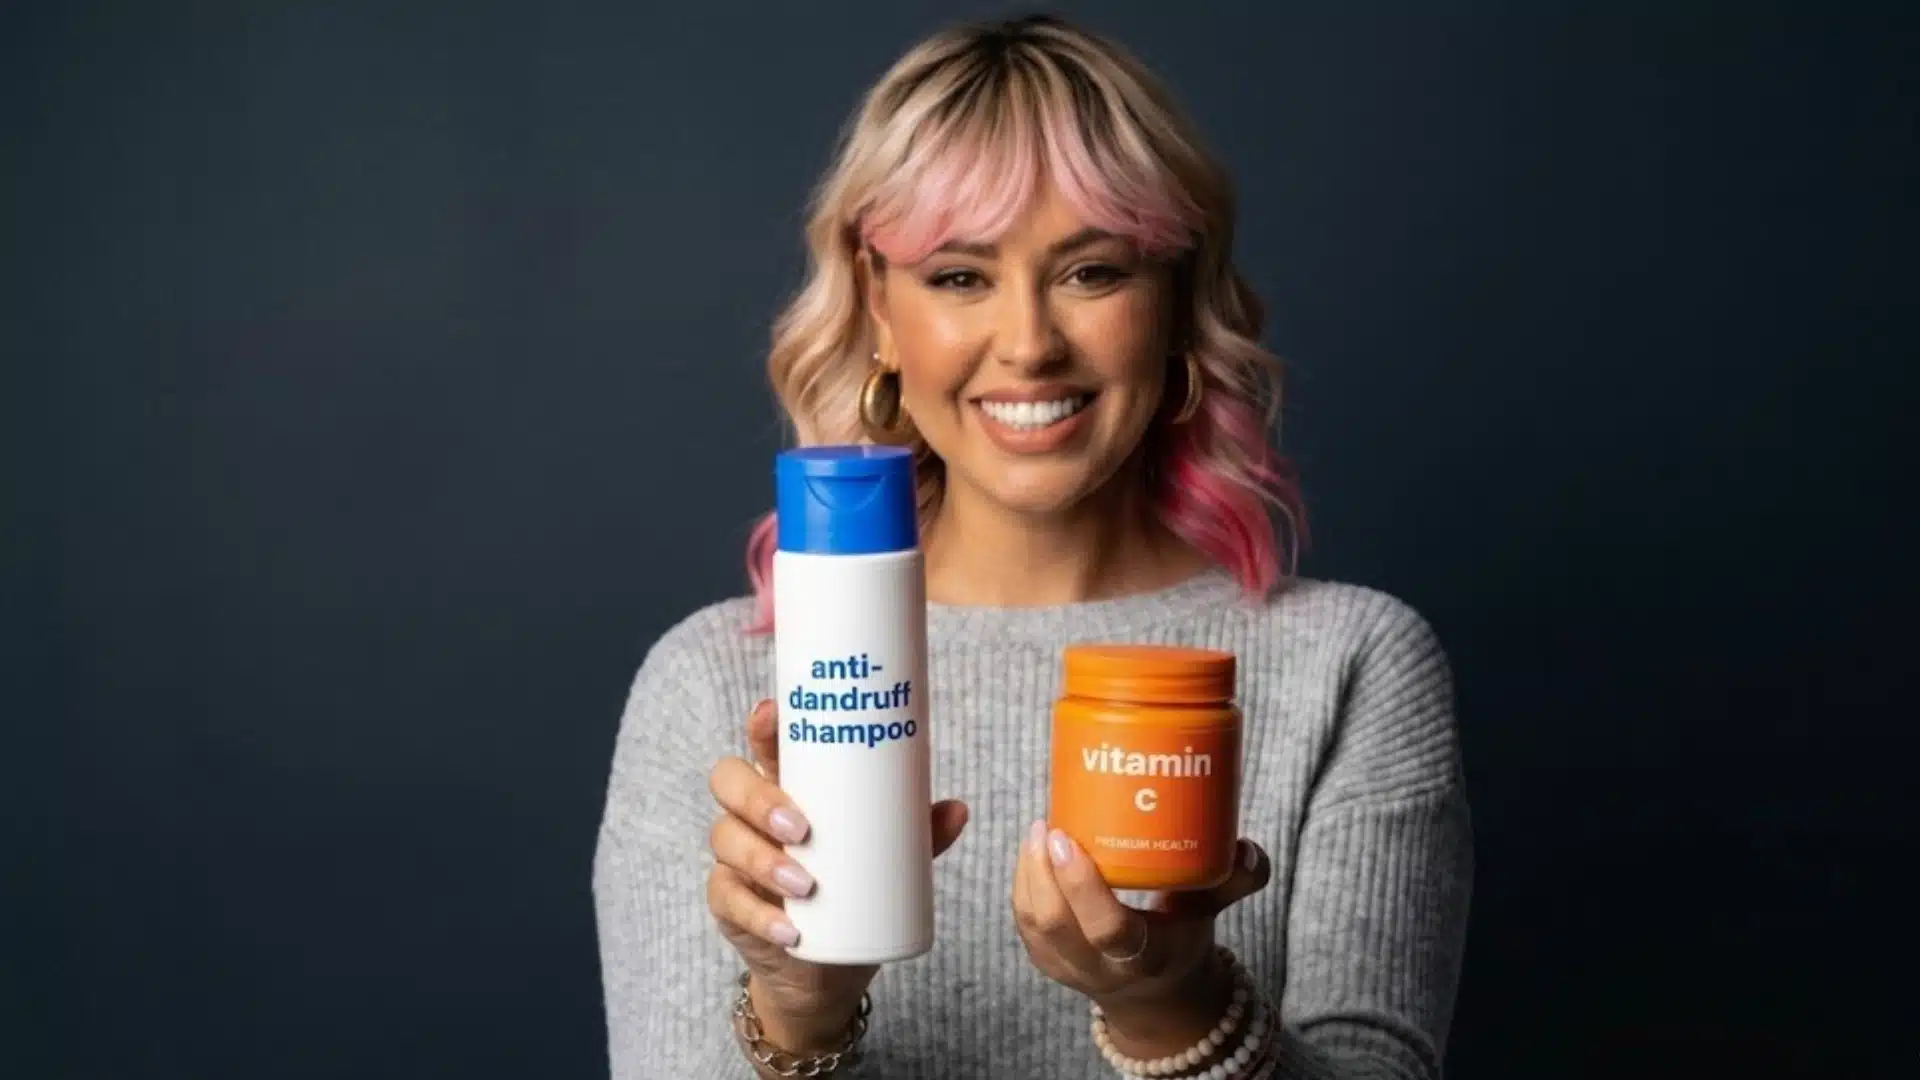
2. Baking Soda and Anti-Dandruff Shampoo
Baking soda gently raises the hair’s pH, opening the cuticle and allowing some dye molecules to wash out.
I mix equal parts baking soda with an anti-dandruff or clarifying shampoo and massage it into damp hair for 5–10 minutes before rinsing.
This method works well for semi-permanent dyes, although it’s less effective on permanent colors, which may see only a subtle tone shift after repeated sessions.
One key tip is to always follow up with a deep conditioning treatment, as repeated exposure to baking soda can strip moisture and leave hair feeling dry or brittle.
3. Clarifying Shampoo or Dish Soap
Clarifying shampoo is a low-friction way to gradually fade semi-permanent hair color. I recommend using it two to three times a week, making sure it’s not labeled “color-safe,” as those are formulated to preserve dye.
Dish soap can remove color faster but is much drier, so I use it sparingly and always follow with a nourishing conditioner.
Over time, these methods help your hair release color gradually without causing immediate damage. The trick is consistency and caution; frequent overuse can compromise texture and shine.
4. Apple Cider Vinegar Rinse
Apple cider vinegar (ACV) is a natural pH-adjusting treatment that helps gradually break down semi-permanent dye molecules.
Mix one part ACV with two parts water, pour it through my hair after shampooing, and leave it for a few minutes before rinsing with cool water.
The cool rinse helps seal the cuticle and restore surface shine. Using ACV two to three times per week can enhance fading while keeping hair relatively healthy.
As with all acidic treatments, follow with a moisturizing conditioner to maintain softness and prevent dryness. I’ve found this method especially useful when paired with gentle shampoos.
5. Hydrogen Peroxide (Use With Care)
Hydrogen peroxide can fade both semi-permanent and permanent dyes, but acts as a mild bleach. Always caution that misuse can cause dryness, brittleness, and scalp irritation.
To use safely, dilute 3% hydrogen peroxide with an equal amount of water, perform a skin patch test first, and apply for no more than 15–30 minutes. Rinse thoroughly and deep condition immediately afterward.
I treat this as a one-off solution for stubborn color and avoid repeating weekly. While it can create noticeable results, patience and careful handling are crucial to avoid damaging hair.
Which Method is Right for You?
Not every method suits every hair type or dye situation. This quick breakdown makes it easier to pick the right starting point.
| Method | Best for | Fading speed | Damage risk |
|---|---|---|---|
| Vitamin C + clarifying shampoo | Semi/demi-permanent | Moderate | Low |
| Baking soda + anti-dandruff shampoo | Semi-permanent | Slow | Low to moderate |
| Clarifying shampoo | Semi-permanent | Gradual | Low |
| Apple cider vinegar rinse | Semi-permanent | Slow | Low |
| Hydrogen peroxide (diluted) | Semi/permanent (stubborn) | Faster | Moderate to high |
| Oil treatment (coconut/olive) | Semi-permanent, gentle fading | Very slow | Very low |
| Commercial sulfur-based remover | Semi/permanent | Moderate | Low to moderate |
Safety note: For informational purposes only, if you have a scalp condition, skin sensitivities, or previously damaged hair, skip these method or consult a professional first. Always do a skin patch test before applying to your scalp and consult your dermatologist.
Gentle Ways to Fade Hair Dye Over Time
If the goal is gradual fading rather than fast color removal, a slower approach helps keep hair healthier throughout the process. Here’s a safe and simple method to follow:
- Oil Treatments: Massage coconut or olive oil into damp hair, then cover with a shower cap for about an hour. This helps loosen dye molecules while conditioning your strands simultaneously.
- Clarifying Shampoo: Increase wash frequency with a clarifying shampoo, around two to three times per week. Always follow with deep conditioning to maintain softness and shine.
- Sunlight Exposure: Gentle sunlight can lift semi-permanent color over time. Works best on lighter tones, while medium shades may fade subtly. Avoid overexposure to prevent dryness.
- Consistency: Repeat these methods gradually over several weeks rather than trying to remove color all at once.
- Hair Monitoring: Check your hair’s texture and elasticity regularly. Adjust treatments if you notice dryness, stiffness, or brittleness to keep hair healthy and balanced.
Aftercare Tips for Healthy Hair
After any color removal session, caring for your hair is just as important as the removal itself. Following these steps helps restore strength, shine, and elasticity:
- Deep conditioning: Use a mask once or twice a week while your hair recovers. Ingredients such as hydrolyzed keratin, amino acids, or argan oil temporarily fill gaps in the cuticle left by dye removal.
- Protein treatments: If you did multiple removal rounds, a weekly protein treatment helps prevent breakage. Always follow with a moisture mask within a few days to avoid stiffness.
- Limit heat styling: Reduce blow-drying, flat ironing, and curling until your hair feels stable and resilient again.
- Wait before re-dyeing or bleaching: Give your hair two to three weeks to recover baseline elasticity before any chemical treatments.
- Regular trims and monitoring: Trim split ends and observe hair texture daily. If strands feel gummy, brittle, or weak, pause treatments and focus on conditioning before proceeding.
When to See a Professional Colorist
Sometimes home remedies just aren’t enough, and that’s when sulfur-based commercial hair color removers can be a helpful step before heading to a salon.
These products work by opening the hair cuticle and breaking down dye molecules in the cortex, without affecting your natural pigment the way bleach does.
They’re available at most beauty supply stores, but it’s important to follow the instructions carefully, work in a well-ventilated space, and plan for a thorough conditioning treatment afterward.
On stubborn permanent colors, they tend to give more consistent results than kitchen-based methods.
However, some situations really call for professional expertise. Dark permanent shades, vibrant reds, and hair that’s been previously bleached can be tricky to correct at home.
Repeated DIY treatments can increase the risk of breakage, especially if your hair starts snapping, feels mushy when wet, or develops uneven texture.
A professional color correction uses controlled techniques to safely lift and rebalance color, reducing guesswork and preventing the kind of damage that often results from multiple home-removal attempts.
Conclusion
Removing hair dye at home is achievable, particularly for semi-permanent and demi-permanent colors.
Vitamin C paste and clarifying shampoos are solid starting points with a low risk of damage. Baking soda is worth a try, but manage expectations; it will not dramatically shift a permanent color.
For stubborn shades that are not responding, a commercial sulfur-based remover or a professional correction will get you further than stacking more home treatments on already stressed hair.
Approach removal in rounds: one session, assess, condition, then decide on the next step. The people who get the best results are the ones who pace it rather than push.
Tried one of these methods? Share what worked for your hair in the comments, or drop a question below if you are still figuring out the right starting point.
Frequently Asked Questions
Can You Remove Hair Dye Faster with Hot Water?
Hot water may help fade hair dye a little quicker, but it can also leave your hair dry and frizzy. Warm water is usually a safer option if you want gradual fading without making your strands feel rough afterward.
Is Lemon Juice Safe for Removing Hair Dye?
Lemon juice can slightly lighten hair color, but it may also dry out your strands if used too often. Mixing it with water and conditioning afterward helps reduce damage while still supporting gradual color fading.
What Should You Do if Your Hair Feels Dry After Color Removal?
Stop fading treatments for a few days and focus on hydration instead. Use a deep conditioner or hair mask regularly to help your hair regain softness before trying any additional at-home color-removal methods.